; Plisherrific: July 2017

Jul 31, 2017

Fine Wine - Australis Pinot-Dah


Feeling a bit uninspired lately... and I always seem to default back to red shades when that happens. Eh, well, you just can't go wrong with the classics, I guess!

[Bottle to nail: Australis Pinot-Dah (1 coat)]
This time, I chose Australis Pinot-Dah, a deep wine red creme, as you may have guessed from the name!

[1 coat: Australis Pinot-Dah]
I only used one coat, and it was pretty much opaque. I've taken these photos under direct lighting so you can almost see some lighter parts, but this is pretty much invisible to the eye. The shade is also a a little darker than shown and actually leans a bit cooler.

[1 coat: Australis Pinot-Dah]
Formula was great, leveled nicely and dried glossy, though as usual, I applied a layer of topcoat over to finish. A nice basic vampy shade. As a bonus, Pinot-Dah also works great as a stamping polish, which Jme previously posted about here!


Jul 24, 2017

Minty Fresh - Revlon Parfumerie Wintermint


I'm (very very) slowly working through my "untrieds" box! Here's one from a birthday a while ago....

[Bottle to nail: Revlon Parfumerie Wintermint (2 coats)]
This is Wintermint from the Revlon Parfumerie range, a collection of scented polishes. These come in the cutest ever little "perfume bottle" shape!

[2 coats: Revlon Parfumerie Wintermint]
Wintermint is a frosty mint green shimmer with lots of silver microglitter and small teal hexes. I also feel that the shimmer in the base shade leans slightly gold which warms the shade up a bit.

[2 coats: Revlon Parfumerie Wintermint]
Formula-wise, it was pretty easy to handle - two easy thin coats that dried quickly. However, I'm not really a fan of the slightly frosty finish. It's not streaky by any means, but somehow the combination of glitter and the shimmer base combines to give a faintly dated look. This polish also dries textured, although all the glitter lays nice and flat!

[2 coats: Revlon Parfumerie Wintermint]
Scent-wise, it was a pretty mild minty scent as you'd expect. Nice and fresh (rather than toothpaste-y), which is where the winter part of the name comes in. Quite a pleasant inoffensive scent, but only really detectable if you bring your nails up close for a sniff, and the fragrance had faded pretty much completely by the second day.

Still an interesting combination, but not quite to my taste!

Jul 21, 2017

Dot Matrix - Ulta3 Spring Break, Honolulu, Tahiti, Tahitian Lime, Elianto Blue

It's time for dots! It's time for dotticure!

[Dot Matrix]
I got Born Pretty's Professional Nail Art Design Brush Set and Dotting Pen. I've been wanting a brush set for awhile now because I've seen how useful they can be but have been holding out from getting them for ages due to irrational fear that they would be difficult to use, haha. Well, never hurts to try!

[Born Pretty's 12pcs/set Pink Professional Nail Art Design Brush Set and Dotting Pen]
The set consists of 11 brushes and a dotting pen. As you can see from the first picture, each brush (except the fan-like brush) come with their own plastic protector. In the second photo, you can see the various flat brushes, fine brushes and the very tiny dotting tool.

[Nail patches peeled off a silicone nail art mat]
Tada, the results of my hard work! You can see I was experimenting with the pattern before I settled on something. So I started out by painting with my base nail polish Ulta3's Spring Break on a silicone nail art mat. Spring Break is a dark purple creme polish. Then, I painted over Spring Break using one of the flat brushes in the set above to make the yellow upside down triangle. I used Ulta3's Honolulu for the yellow. It's so much easier making a pointy triangle when you actually have the right brush for it, hahah. There's no need to wait for nail polish to dry and then mess around with tape, or do very slow careful free hand with fat nail polish brushes.

Then I used the very tiny dotting tool to dot on nail polish. It's actually so easy to do dotticure when done first on a flat mat! I had no idea, really, I'm so used to dotting on my nails directly. And I find it's so much easier to control the dots with a dotting tool that has such a small head. For most of the dots above, I used a liberal amount of nail polish to create larger dots. They went on so smoothly. I could actually do much tinier and neater dots as well, if I used less nail polish per dot, but I didn't want my dots to be that small this time. But I have ideas for next time already!

[Base: Ulta3 Spring Break (purple) and Ulta3 Honolulu (yellow)
Dots: Ulta3 Tahiti, Ulta3 Tahitian Lime, Ulta3 Honolulu and Elianto Blue]
To reiterate, the base comprises of Ulta3 Spring Break and Ulta3 Honolulu. For the dots, I used the following colours:

  • Ulta3 Tahiti - a neon coral orange that looked less neon against the dark purple background
  • Ulta3 Tahitian Lime - a green creme polish. There's a trend with these names going on!
  • Ulta 3 Honolulu - a yellow creme polish
  • Elianto blue - a mid-blue creme polish.
I was actually aiming to make this whole mani comprise of Ulta3 nail polishes but I couldn't find a suitable blue! What a shame.


[Base: Ulta3 Spring Break (purple) and Ulta3 Honolulu (yellow)
Dots: Ulta3 Tahiti, Ulta3 Tahitian Lime, Ulta3 Honolulu and Elianto Blue]
The dots aren't perfect, but I still loved how they turned out!


You can get the Professional Nail Art Design Brush Set and Dotting Pen here and you can also use the discount code above for full price items at Born Pretty!

Jul 17, 2017

Holo Couture - Holographic Lace Transfer Foil


Ahhh, that feeling when you think you better edit up some photos quick smart for posting, then you realise that "Ooooh, waitaminute, here's some that I prepared earlier!!" =)

[Holo lace]
This is usually in conjunction with the feeling of "I sure hope I haven't posted this before yet..."

[Foil to nail: Holographic Lace Transfer Foil]
Anyway! Here's another transfer foil manicure - this one is unnamed but it's basically a black lacey pattern over a silver holo background. It's an opaque foil so basically, it doesn't have any transparent bits to show off your base shade (if you choose to use one).

[Holographic Lace Transfer Foil]
I used a basic silver shade as my base in case there were any gaps in the transfer, but I think with how busy the design is, it wouldn't be very obvious anyway.

[Holographic Lace Transfer Foil]
There's quite a bit of what looks like tip wear, but it's really just the topcoat shrinking the foil I think. I think I may have used Picture Polish Revolution for this one, but I can't be too sure. At this point, I didn't yet have the Born Pretty No Smudge Topcoat that I reviewed last week. The holo goodness is definitely still there though!

In the end, this mani didn't last more than a couple of days, but transfer foils never really do on me!


Jul 10, 2017

Nail Foil Topcoat Comparison - OPI, Picture Polish Revolution, Revlon Quick Dry, Born Pretty No Smudge Top Coat


Haven't done a comparison for a while - and here's an interesting one! Top coats!

[Battle bottles]
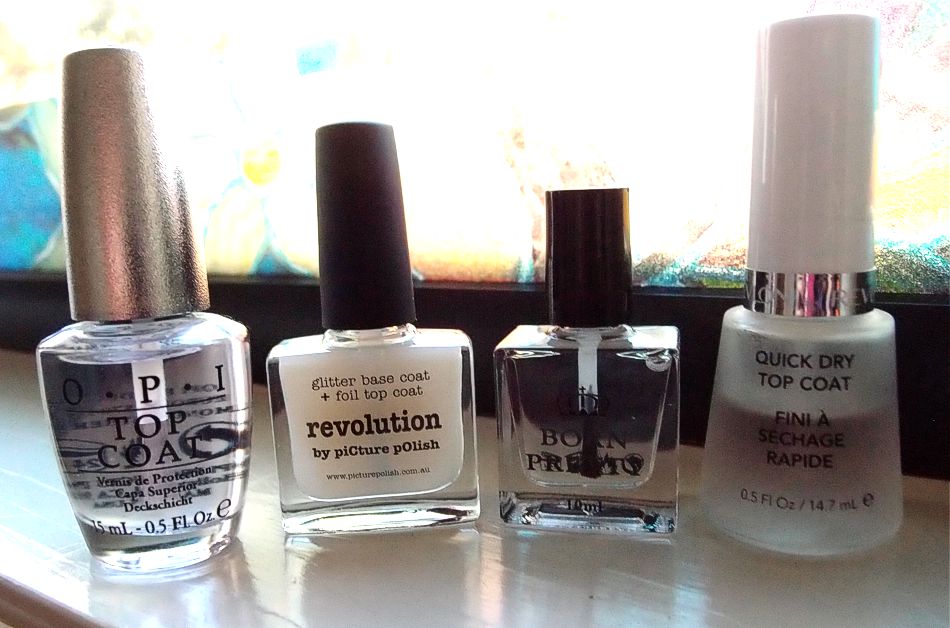
The topcoats I'm trying out today are from left to right: OPI Top Coat, Picture Polish Revolution, Born Pretty No Smudge Top Coat and Revlon Quick Dry Top Coat.

[Born Pretty No Smudge Top Coat]
I recently received the Born Pretty No Smudge Top Coat from Born Pretty for review and I was super excited because in the item description, it is meant to work over stamping designs, holo/chrome powders and nail foil transfers! It comes in a nice weighty rectangular bottle of 10ml volume. The black cap actually comes off, as you can see in the first photo. I found it much easier to use with this off, as that suits my smaller hands better. I think you could leave it on during application if you prefer.

[Fiber Optics Nail Foil Transfer]
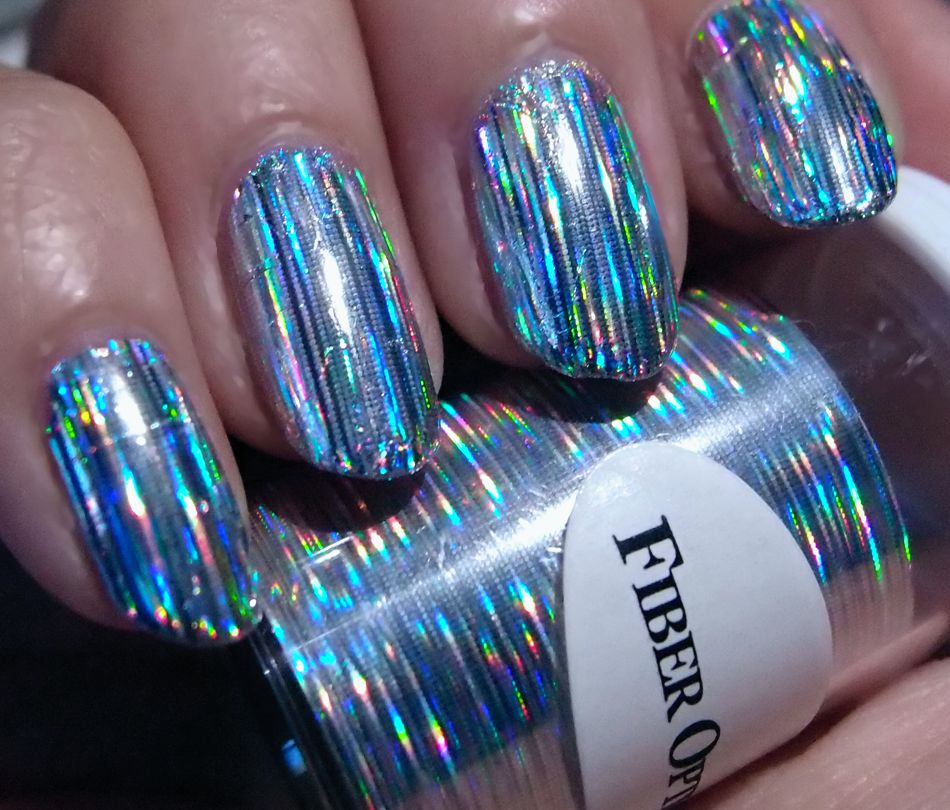
As a challenge, I tried to pick out a super holo nail foil transfer from my collection; this one is called Fiber Optics. I'm not sure I picked the best one for the no-crinkle challenge in the end, but it's certainly super rainbows up in here... Above you can see the process of cutting out appropriately-sized rectangles for each nail...

[2 coats: Color Club Harp On It]
As always, I picked a matching silver holo base since my foil transfer was a silver holo. This lovely is Color Club Harp On It from the Halo Hues collection. Both Jme and I have previously posted about this here and here, but I couldn't resist putting more photos of this beauty up. Ah~~

[Base: Color Club Harp On It (2 coats); Foil: Fiber Optics (pinky)]
I know Harp On It is amazingly bling, but there's just something about holographic nail foil transfers. This photo doesn't even capture it properly but the holo shine with Fiber Optics is on a whole other level.. 

[Nail foil transfer: Fiber Optics]
So obviously, I have to have some photos BEFORE I put topcoat on, before any crinkly catastrophes occur. Check it out! These were so hard to photograph - they seriously look like some crazy techno robot nails under direct lighting.

[Nail foil transfer: Fiber Optics]
Once more before topcoating....

[Topcoat (L-R): Revlon Quick Dry, Born Pretty No Smudge, Picture Polish Revolution, OPI;
Nail foil transfer: Fiber Optics]
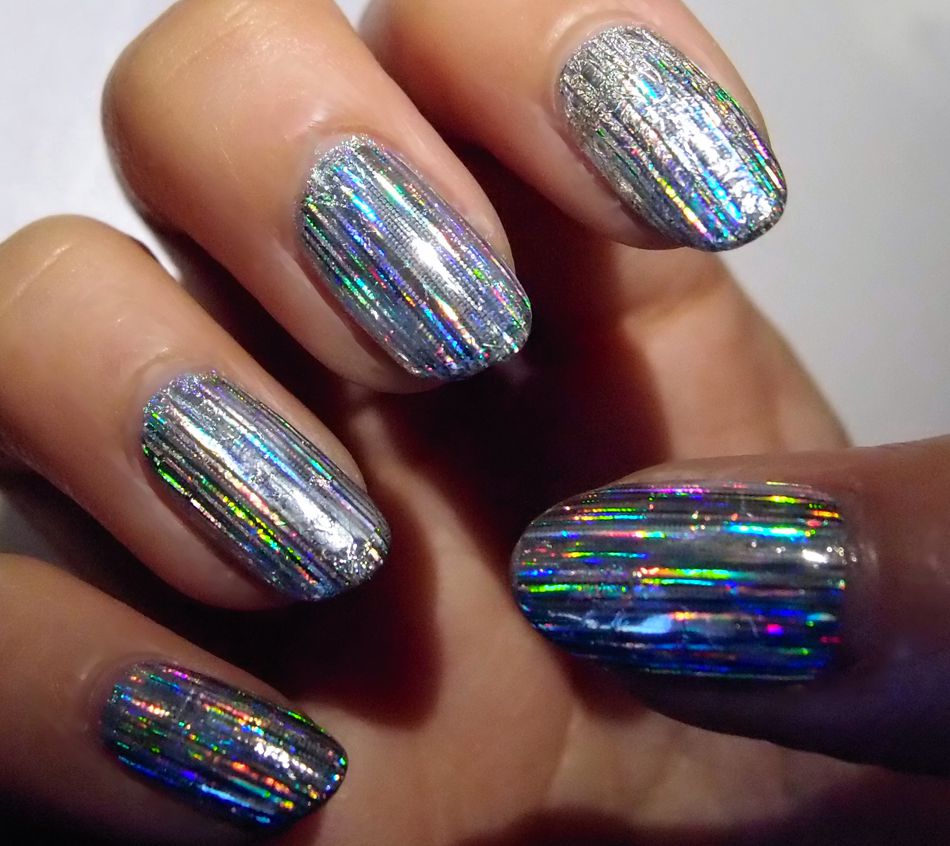
Et voila! So, there were a couple of surprises here. I'll list out what I used and the result..

Pinky: Revlon Quick Dry - I expected a quick-drying polish to leave a crinkly and dull finish but it only crinkled slightly and remained holographic.
Ring: Born Pretty No Smudge - No crinkling, good holo. Bling-addict approved!
Middle: Picture Polish Revolution - My positive control, so to speak. Also no crinkling, good holo!
Index: OPI Top Coat - Whoa, crinkle! Pretty much all crinkled, and patches of dullness. No bueno!

[Topcoat comparison: Revlon Quick Dry (pinky); Born Pretty No Smudge (ring);
Picture Polish Revolution (middle); OPI (index); No top coat (thumb)]
So basically, Revlon works in a pinch. OPI to avoid. Picture Polish Revolution and Born Pretty No Smudge Top Coat are both fine to use but one is also 1/3 the price of the other so if you're trying to save up (for more polish, I assume), then Born Pretty No Smudge Top Coat is the way to go.

I will note though that both topcoats from Born Pretty and Picture Polish feel tacky to the touch a bit longer than the Revlon and OPI. I don't think it's particularly long, I'm probably just used to the Quick Dry!

I mentioned above that I wasn't sure if I picked the most challenging foil transfer design - I truly expected more crinkling to happen! Well, that'll be an experiment for another day.. 

Again, you can purchase the Born Pretty No Smudge Top Coat here, and check out the entire range at Born Pretty. Code above also available for some savings off full priced items!

Jul 6, 2017

Tick Tock - Born Pretty Time Travel BPX-L023, Hit the Bottle Spun Gold, Pretty Serious Dupe

Let's gear up for a little steampunk!

[Tick tock]
Right off the bat, I'll tell you that I really like how this turned out. The different gears on every nail and the colours just came together very nicely, in my humble opinion.

Let's start with my base. I used Pretty Serious' Dupe, which I swatched last week. Here it is again:

[Pretty Serious' Dupe]

Then I stamped over that using patterns from Born Pretty's Time Travel BPX-L023 stamping plate and Hit the Bottle's Spun Gold, a light gold stamping polish. Time Travel BPX-L023 has got a great variety of gears, in different styles and sizes.

[Born Pretty Time Travel BPX-L023 stamping plate]
I decided to use the gears in the big clock, because I thought the gears there had an awesome level of fine detail and the variety would keep the mani organic looking.

[Base: Pretty Serious Dupe
Stamping: Hit the Bottle Spun Gold, Born Pretty Time Travel BPX-L023 plate]
Okay, first off, I broke a nail on my left hand, which is why I'm kind of obviously blocking it in that first photo. Then on my right hand, I managed to smudge the stamped pattern towards the tips of my nails when I painted on my top coat. I dragged it a little too much, oh dear...

And here's some close-ups because I think they show off the stamped pattern against the blue-purple base pretty well.

[Base: Pretty Serious Dupe
Stamping: Hit the Bottle Spun Gold, Born Pretty Time Travel BPX-L023 plate]
I really do love the little gears on this plate. I love the gold gears against the purple-blue-green glitter. The sharp lines on the teeny tiny gears stamped so nicely as well. I got more compliments than usual on the mani, and a couple people stopped to look at them from close-up. Even I kept examining my own nails. What a fun mani this has turned out to be.


If you want your nails to look like the inside of an old timey clock, you can find Time Travel BPX-L023 here at Born Pretty. As usual, you can get non-sale items with a little discount if you use the code above!

Jul 3, 2017

Rainbow Lights - Born Pretty Magical Series M012 Destiny Fairy, Dance Legend Hell Money


Hello all! Today I have one of the new multichrome flakie polishes from Born Pretty to review.

[Rainbow Lights]
Check it out! This one is from the Magical Series - M012 Destiny Fairy. It's predominantly a green-to-purple shift but you get a hint of bronze at extreme angles, as you can see in the bottle pic.

[Born Pretty Magical Series - M012 Destiny Fairy]
This polish comes packaged in a nice matte cardboard box and a holographic sticker at the bottom with the product name and number.

[Base: LA Girl Blackout (1 coat); Flakie: Born Pretty Destiny Fairy (1 coat)]
As suggested, I used one layer of a plain black creme, and then applied Destiny Fairy over the top. These pics are just one coat over the black base! I was so impressed with the flake density and coverage. I reckon you could just use two coats of the flakie polish and skip the black base. The photos above show the green-purple shift. You can even see a hint of gold in the bottom photo!

[Base: LA Girl Blackout (1 coat); Flakie: Born Pretty Destiny Fairy (1 coat)]
In terms of dry time, this dried quite quick which is always a plus. The brush is also wide which allows you to pick up a decent amount of polish and makes it easy to paint each nail in 2-3 swipes. The flakes lay nicely flat for a smooth sparkly finish. Definitely an easy polish to work with! I'd love to try out their other shades!

[Left: Born Pretty Destiny Fairy; Right: Dance Legend Hell Money]
I noticed that I'm very prone to buying polishes which are veeerrrryyy similar, so when I received this for review, I got this feeling I'd swatched something similar before. So here's Dance Legend Hell Money next to Destiny Fairy. It looks more different here due to the different bottle shapes, but both are green-purple shifters.

[Base: LA Girl Blackout (1 coat); Middle: Dance Legend Hell Money (1 coat);
Index, Ring, Pinky:
Born Pretty Destiny Fairy (1 coat)]
Can you tell which is which? I think so! My middle finger is Hell Money, and the others are Destiny Fairy. Basically, the flakes are larger and the shift is more pronounced with Destiny Fairy. Hell Money also leans slightly more to the green shift. Other than that, they are really quite similar! In fact, I'm kinda liking the finish of Destiny Fairy more, purely from a sparkly point of view!

[Base: LA Girl Blackout (1 coat); Flakie: Born Pretty Destiny Fairy (1 coat);
Topcoat: Born Pretty Matte Topcoat (1 coat)]
I ended up topping off the polish with a layer of matte topcoat because flakies always look awesome matte-ified. This photo is under nice diffuse fluorescents at work and is a really great demonstration of the flake size and excellent colour shift-iness.


If you're interested in checking out Destiny Fairy, you can find it here on the Born Pretty site. They have plenty more in the range, including matching multichrome shimmer polishes! As always, you can use our code above for a little extra discount off non-sale items. =)