; Plisherrific: April 2017

Apr 27, 2017

Silver Well - Born Pretty Mirror Nail Polish

What I have here is the most shiny and mirror-like chrome nail polish ever to be seen. But please, please read the post in its entirety because I'll cover off how to achieve that shine and the downsides for all this gleaming gorgeousness.

[Mirror, mirror, on the wall...]
Hello. Hi, me. Yes, you can actually see my blurry reflection with a camera in my nails. That's how shiny this nail polish is.

This is Born Pretty Mirror Nail Polish. It comes in a set of two bottles, one containing the chrome nail polish and another is a clear top coat.

[Bottle to nail: Born Pretty Mirror Nail Polish]
 Look at that, the nail polish very nearly matches the shininess of the bottle!

The instructions are to use the mirror nail polish and then seal with the top coat they have provided. While that produces a shiny chrome finish, it's not that much shinier than regular chrome nail polish.

The most amazing mirror effect can be achieved by using their top coat as a base coat as well (preferably with your choice of usual base coat first to protect your nails). Their top coat provides an incredibly smooth, frictionless surface for the mirror nail polish. After using the top coat as a base coat (hah!), apply a medium layer of the mirror nail polish. Don't make the layer too thin or it won't come off as glossy. When you're applying over the base coat consisting of the top coat (double hah!), it will seem like you're pouring silver paint on your nails and they seem to almost spread out on their own.

It's the most amazingly glossy mirror finish ever. Just look at this picture:

[Born Pretty Mirror Nail Polish]
Isn't it stunning?

If you don't seal it with the top coat, the mirror shine will be at its peak and it will be glorious. But it will likely only last a couple hours. So you get the amazing shine, but with the shortest lifespan ever. Then it starts to chip and lifts like it's practically leaping off your nails.

If you seal this beautiful mirror nail polish with the provided top coat, the nail polish will last longer (but not by a lot, as warned by Born Pretty), by which I mean it was maybe a day or so before I started seeing the varnish lift at the corners. But the nail polish is slightly less shiny with the top coat on. In fact, the top coat is unforgiving if there are flaws and will serve to highlight any scuff marks, or less than perfect brush stroke.

Here, you can see the nail polish with their top coat applied.

[Born Pretty Mirror Nail Polish]
It's still got a beautiful chrome finish, but it's not the unbelievable mirrored finish, as shown in the previous photos.

Born Pretty's Mirror Nail Polish is undoubtedly gorgeous and eye-catching. But the short life span means you can't do very much with it. You could maybe wear the mirror-like shiny version for a dinner outing that lasts a couple hours. Regardless, I'm still glad I bought it just to experience the mirror shine.

Apr 24, 2017

Gold Sands - Missha Crystal Nail Polish GGL01


Quick post again! This one is kind of an abandoned mani... I planned to stamp over it but couldn't find the right shade that I had in mind so gave up after a few tries... but here is the base polish!

[Bottle to nail: Missha Crystal Nail Polish GGL01 (2 coats)]
I was looking for an extremely yellow gold and was almost thinking I didn't have one in my stash when I pulled this out! This is Missha GGL01 from the Crystal nail polish line. 
[2 coats: Missha Crystal Nail Polish GGL01]
GGL01 is a very yellow gold! It's a yellow/gold base, absolutely packed with gold shimmer as well as gold and silver glitter bits. Very twinkly and very gritty! Good opacity in two coats and nice even coverage. Dry time was also decent.

[2 coats: Missha Crystal Nail Polish GGL01]
These photos are before topcoat (see: abandoned mani) so it's not as sparkly as it could be but rest assured, it's pretty dang shiny what with all those glitter pieces! Ah well, maybe one day I'll revisit this...


Apr 20, 2017

Twilight Breeze - Dance Legend Wind of Change

Keeping it simple today! I loooooove thermal polishes. Here, we have Dance Legend's Wind of Change from their Bow Conversion line.

[Dance Legend Wind of Change]
Ev reviewed the same polish here (go on over to see the three tone effect, which I didn't manage to get in photos!)

I think it's pretty interesting to see the difference in colour between her review and mine. I run rather warm in general and you can see that the nail polish against my nail bed is bluer than what you see in Ev's review. The weather has also cooled down quite a bit so the tips of my nails with Wind of Change on were often cooler in temperature and was constantly purple.

Wind of Change dries matte and has scattered holo microglitter through it, just to add an extra zing.

[Dance Legend Wind of Change]
I love that with one bottle of nail polish, I got two different colours on my nails. It's why I'm forever charmed by thermal polishes.

Apr 17, 2017

Blue Eyes - Dance Legend Earth


Hm, I've been a little uninspired lately - a combination of being frazzled from work and feeling slightly under the weather. So all I've got today is a plain swatch of a shade that's not plain at all!

[Bottle to nail: Dance Legend Earth (2 coats)]
This is Dance Legend Earth from the Sahara Crystal collection. This one, as you can see, is a textured finish polish and is chockers with the loveliest blue glitter. If you look closely at the bottle (and on the nail as well), there's also a hint of duochrome with those flashes of purple.

[2 coats: Dance Legend Earth]
It seems like there's the blue glitter, and some darker navy "sand" particles which contribute to the textured effect. This had excellent opacity - I used two coats but you could probably get away with one thick one. It dries quickly and to a matte finish (albeit glittery), as most textured polishes do, and is super knobbly to the touch!

[2 coats: Dance Legend Earth]
I quite liked this finished result so I was going to leave it matte for a few days before testing some glossy topcoat over it. However, I was initially worried about removal so I used a peel-off base... which was a bit toooo good! They peeled really easily so this didn't last too long on me! I don't doubt it would have excellent wear (and hideous removal) if I had just used a regular base!

I've swatched this randomly before though and it definitely looks super gorgeous and sparkly with added layers of glossy topcoat!


Apr 10, 2017

Red Delicious - China Glaze Red Satin, Hit the Bottle Spun Gold, Born Pretty BP-L029


Hello hello - today I have a stamping mani that looks kind of suitable for the festive season, even though it isn't at the moment! I really only did these colours because I was coordinating it with my outfit... =p

[Bottle to nail: China Glaze Red Satin (2 coats)]
My base is China Glaze Red Satin, a nice basic deep red creme that I've previously reviewed here! Look at the lovely rich glossy goodness!

[Base: China Glaze Red Satin (2 coats);
Stamping: Hit the Bottle Spun Gold, Born Pretty BP-L029]
I then stamped over this with a champagne gold stamping polish, Hit the Bottle Spun Gold. The pattern I used is of flowers and vines and comes from Born Pretty plate BP-L029, a great floral-themed plate.

[Base: China Glaze Red Satin (2 coats);
Stamping: Hit the Bottle Spun Gold, Born Pretty BP-L029]
I was probably rushing this one a little so the stamping isn't as crisp as I would like. Still a nice way to add a bit of interest to a classic red mani!


Apr 6, 2017

The Colours of Apollo - Essence Rock My Soul, Hit the Bottle Spun Gold, Hit the Bottle Burnt Orange, Born Pretty L026 stamping plate

Here we have an attempt to stamp with two different colours. I think it turned out okay, what do you think?

[Sun Rays]
For the base polish, I used Essence Rock My Soul from The Metals collections, which is a teal chrome-like nail polish. It applies smoothly and has a pretty lovely greeny glow to it.

[Essence Rock My Soul]
Then I stamped on it using the pattern in the blue square below, from Born Pretty's L026 stamping plate. I rather like this stamping plate and they have some gorgeous patterns from it. If you do have very long or wide nails though, you might not get enough of some of the patterns for full coverage.

[Born Pretty L026 Stamping Plate]
I used Hit the Bottle's Spun Gold (a pale gold stamping polish) and Hit the Bottle's Burnt Orange (a bronze stamping polish) to stamp the pattern on. You can see that Spun gold is on the upper half of the nails and Burnt Orange is on the bottom half.

[Stamping: Hit the Bottle Spun Gold, Hit the Bottle Burnt Orange
Born Pretty L026 Stamping Plate
Base: Essence Rock My Soul]
I think the stamped polishes are close enough in colour that it creates an interesting almost gradient effect. All in all, I like the result!

Apr 3, 2017

Blush It - Dance Legend Collection SUN shine #194 UV colour change


I was looking at this polish in my stash, wondering why I picked up a creme glitter from Dance Legend out of all the many interesting polishes that they stock...

[Delicious cupcake]
...then I realised that this is from their SUN shine collection which is a range of polishes that change colour in response to UV light! That deep pink/purple spot on the polish bottle is where I briefly shone a UV light on the polish bottle!

[2 coats: Dance Legend SUN shine collection #194 (no UV)]
This one is #194 and it's a really sweet happy polish - like a strawberry cream cupcake with hundreds and thousands! I really liked this colour combination. In the absence of UV light, the base is actually almost grey-white. It slowly darkens to a pinkish purple as the amount of UV exposure increases.

[2 coats: Dance Legend SUN shine collection #194 (no UV)]
There are three different sizes of hex glitter in the polish in many shades - gold, blue, magenta, orangey-red. I used two coats here and the glitter density is great, no need to fish around to pick up all the glitter bits!

[2 coats: Dance Legend SUN shine collection #194 (UV on left; no UV on right)]
Here's the colour after I shone a UV torch on two nails. This polish changes colour really quickly! You only need to be in (or out) of the sun for 10 seconds or so (depending on light intensity of course) to get the full colour change.

[2 coats: Dance Legend SUN shine collection #194 (direct sun)]
Check it out! Isn't it an amazing contrast in full sun? I'm pretty impressed with this UV colour change polish!

Apr 1, 2017

String Art Manicure (complete with video!) - Essie, Elianto, LA Girl, Australis, Born Pretty nail art mat

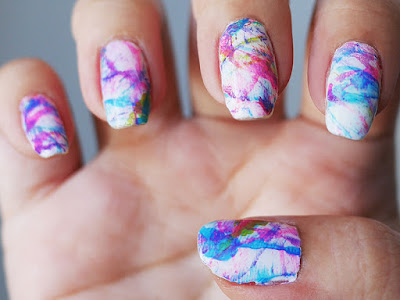
Today, we have something a little different. I did an abstract art manicure using a silicone nail art mat and string art. Yes, string art. I'm bringing kindergarten level art into this.

[String nail art]
Today is an unusual post because I have a video tutorial! A first for myself, and a lot of learning to be had while making it, haha. You can watch the video here:


But if you still want to read a tutorial, here's a simple one:

1. First, paint ten patches of nail polish as the base for your decals. I just paint them wherever nowadays.


2. Get thin semi-glossy magazine papers and sandwich the silicone nail art mat between them. Paint the end of a sewing thread with nail polish and put it on the patches of nail polish. Close the paper over the thread and mat, press down with one hand gently, then pull out the thread from between the paper and the mat.


3. You got your first pattern, now! It'll look something like the pattern below. Now keep going with your choice of nail polish, and repeat step 2 several times over.


Here are some progress shots as I layered on string art patterns:


Unfortunately, one nail patch did come off and stuck to the underside of the paper. I peeled it off the paper, stuck it back on to the mat with application of nail polish beneath the patch and kept going. It worked fine up to the last round, then it came off again because I hadn't given the fix enough drying time. It was still salvageable to be used on my pinkie finger since that one's so much smaller.

Peel off all the nail patches from the mat, apply base polish to your nails and then press on these nail patches. Remove any excess bits of nail polish and then seal it with a clear top coat. Then you get the following!

[String nail art]

You can use any nail polish (although preferably, nothing quick dry for the string art parts). The nail polishes I used were:
- Essie Private Weekend
- Blue and green Elianto nail polishes
- LA Girl Hustle
- Australis Fairmont Fling
- Australis Pinot-Dah

Maybe I'm biased, but I love this string art manicure (stringnicure???). :D  It's just so bright and colourful and it looks so artistic. That's an achievement considering how un-artistic I am.

Anyway, hope you enjoy and let me know if you try this out!